
Contents
Delight in our signature teriyaki chicken recipe featuring a perfect balance of sweet and savory flavors. Quick, easy, and simply irresistible—try it today!
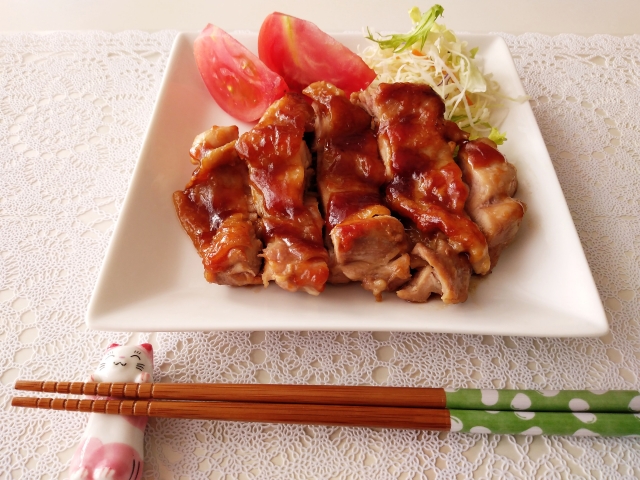
Chicken Teriyaki Crispy Skin & Savory Glaze
Difficulty: ★★★☆☆Servings
2
servingsPrep time
10
minutesCooking time
10
minutesChicken Teriyaki Ingredients
1 chicken thigh (bone removed), about 300g (10–11 oz)
Substitute: Chicken breast or chicken tenders for a leaner option (though the thigh is juicier).- Sauce (A)
1½ tablespoons soy sauce
1½ tablespoons mirin
Substitute: 1 tablespoon sugar + 1/2 tablespoon mild vinegar (taste will differ).1½ tablespoons sake
Substitute: Dry sherry or white wine.1/2 tablespoon sugar
(Note: If you don’t have mirin or sake, you can still try a 1:1 mix of soy sauce & sugar, plus water. The flavor is less complex, but workable.)
Chicken Teriyaki Directions
- Prep the Chicken
Bring to Room Temperature: For more even cooking, let the chicken sit out for about 10–15 minutes if it was refrigerated.
Trim Excess Fat or Skin (optional): Some prefer removing large flaps of skin or excess fat for a leaner result.
Pierce the Skin: Use a fork or tip of a sharp knife to poke shallow holes across the skin side. This helps render fat and lets flavors penetrate.
Even Out Thick Areas: If one side is significantly thicker, make a small slit or press the fillet so it cooks evenly.
Combine the Sauce (A): In a small bowl, mix soy sauce, mirin, sake, and sugar. Set aside. - Pan-Sear the Chicken
No Oil / Salt initially: In a preheated pan over medium heat, place the chicken skin-side down.
Render Fat: Cook for 3–4 minutes, letting the skin crisp up. If the fillet curls, press gently with a spatula for even browning.
Absorb Excess Fat: Chicken thigh releases oil as it cooks. Use a paper towel (gripped by tongs) to soak up some grease if it pools, ensuring a crispier result. - Flip & Finish Cooking
Flip: Turn the chicken. Cook an additional 2–3 minutes. The aim is about 80% doneness since it will finish in the teriyaki sauce.
Add the Sauce (A): Pour the mixed sauce into the pan around the chicken, still on medium heat. It will bubble and start reducing.
Baste: As the sauce thickens, spoon it over the chicken’s skin to form a glossy glaze. Watch for small bubbles turning larger—this indicates the sauce is reducing. - Reduce the Sauce & Glaze
Monitor Heat: The sauce quickly goes from watery to syrupy. Lower the heat if it reduces too fast or threatens to scorch.
Final Basting: Once the sauce forms a thick, shiny coating on the skin, and the pan has minimal liquid left, remove from heat. - Slice & Serve
Let the Chicken Rest briefly, about 1 minute, then slice into bite-size strips.
Plate: Drizzle any extra sauce from the pan over the slices.
Enjoy with steamed rice and a side of vegetables or salad.
Notes
- Tips & Points
Skin Crispiness: Pressing the chicken flat and removing excess rendered oil during cooking helps achieve a crispy skin.
Marinating: If you have extra time, marinade the chicken in sauce (A) for 15–30 mins prior to cooking for more depth of flavor (reduce final sauce time if marinade is used).
Sauce Thickening: Keep an eye on the sauce as it transitions from bubbling to a syrupy consistency—this is where overcooking or burning can happen quickly.
Substitutions: If sake/mirin are unavailable, a combo of white wine or water + sugar can be used, but you’ll lose some complexity.
Serving Suggestion: Top with sesame seeds or chopped green onions for added color and crunch.